I still remember the first time I tried Punch Needle Rug Hooking – I was amazed by how therapeutic and creative it was. But what really got me hooked was the sense of accomplishment when I finished my first project. Despite its growing popularity, there’s a common myth that Punch Needle Rug Hooking is a complicated and time-consuming craft, requiring a lot of specialized tools and expertise. However, the truth is that with the right guidance, anyone can get started and create beautiful pieces.
In this article, I’ll share my personal experience and practical tips on how to get started with Punch Needle Rug Hooking. You’ll learn how to choose the right materials, create your own designs, and bring your projects to life. I’ll cut through the noise and provide you with honest advice on what works and what doesn’t, so you can avoid common mistakes and focus on enjoying the process. Whether you’re a seasoned crafter or a complete beginner, this guide will give you the confidence to unleash your creativity and take your Punch Needle Rug Hooking skills to the next level.
Table of Contents
Project Overview
Total Time: 2 hours 30 minutes to several days
Estimated Cost: $50 – $200
Difficulty Level: Intermediate
Tools Required
- Punch Needle (with interchangeable needles)
- Hooping Frame (or a simple embroidery hoop)
- Scissors (dedicated for cutting fabric)
- Tape Measure (for measuring workspace and materials)
- Ruler (for straight edges and guides)
Supplies & Materials
- Monk’s Cloth or similar even-weave fabric (for the foundation of the rug)
- Yarn or fabric strips (in various colors for design)
- Thread (for sewing the edges of the rug if necessary)
- Batting (optional, for added thickness and comfort)
- Binding fabric (for finishing the edges of the rug)
Step-by-Step Instructions
- 1. First, let’s get started with the basic supplies you’ll need for punch needle rug hooking. You’ll need a punch needle, some fabric for the foundation, yarn or thread for the design, a hoop or frame to keep everything taut, and some scissors to cut your yarn as you work. Make sure you have a comfortable and well-lit workspace, as this will make the process much more enjoyable.
- 2. Next, you’ll want to prepare your fabric by cutting it to the right size and stretching it over your hoop or frame. This will give you a smooth surface to work on and help you achieve an even tension. Take your time with this step, as it’s crucial for getting the best results from your punch needle rug hooking project.
- 3. Now it’s time to create your design. You can use a pattern or create your own freehand design. If you’re new to punch needle rug hooking, it’s a good idea to start with a simple pattern and gradually move on to more complex designs as you gain confidence and experience. Use a pencil or marker to lightly draw your design onto the fabric, making sure it’s centered and evenly spaced.
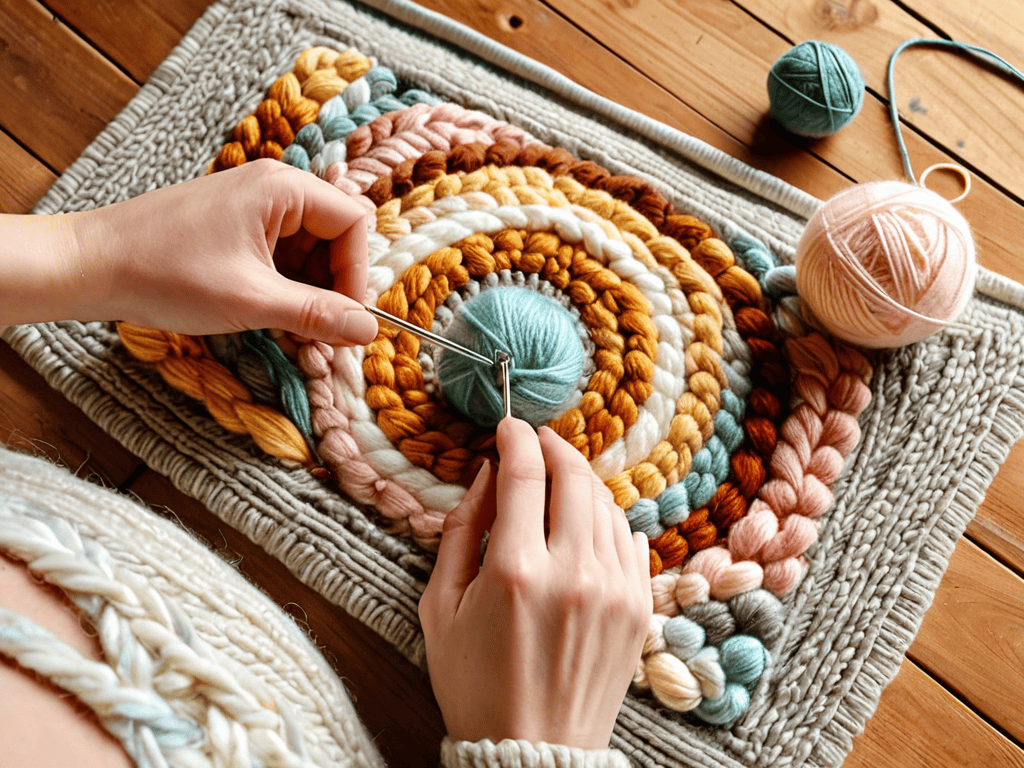
- 4. With your design in place, you can start punching your yarn through the fabric. Hold the punch needle at a 45-degree angle and gently push it through the fabric, then pull the yarn all the way through to create a loop on the underside. Repeat this process, moving along your design line and creating loops as you go. Remember to keep your tension even, as this will affect the final texture of your rug.
- 5. As you work, you’ll need to trim your yarn tails to keep them from getting in the way. Use your scissors to cut the yarn close to the fabric, leaving just enough to secure the loop. This will help you maintain a neat and tidy workspace, and prevent your yarn from getting tangled or knotted.
- 6. Once you’ve completed your design, you’ll need to secure your edges to prevent the rug from unraveling. You can do this by folding the raw edges of the fabric over twice and stitching them in place, or by using a binding tape to cover the edges. This will give your rug a professional finish and help it last longer.
- 7. Finally, you can add a backing to your rug to give it extra stability and protection. Cut a piece of fabric to the same size as your rug, then use a strong adhesive or stitching to attach it to the back. This will help prevent the rug from slipping or bunching up, and make it easier to clean and maintain.
Mastering Punch Needle Rug Hooking

To take your skills to the next level, it’s essential to master the fundamentals of punch needle techniques for beginners. This involves understanding how to create consistent yarn loops and navigating various rug hooking patterns and designs. By practicing these skills, you’ll be able to bring your unique vision to life and create stunning pieces that reflect your personal style. Choosing the right monk’s cloth is also crucial, as it provides the foundation for your design and affects the overall texture and appearance of your work.
As you become more comfortable with the basics, you can start to experiment with different materials and tools to enhance your craft. For instance, creating texture with yarn loops can add depth and visual interest to your pieces. It’s also worth considering the differences between punch needle vs traditional rug hooking, as each method has its own unique advantages and challenges. By exploring these variations, you can develop a more nuanced understanding of the craft and expand your creative possibilities.
By focusing on these key aspects, you’ll be well on your way to becoming a skilled practitioner of this traditional craft. Remember to stay patient and persistent, as mastering punch needle rug hooking tools and materials takes time and practice. With dedication and a willingness to learn, you’ll be able to create beautiful, one-of-a-kind pieces that showcase your artistic talents and attention to detail.
Punch Needle vs Traditional Hooking
As you continue to explore the world of punch needle rug hooking, you may find yourself wanting to connect with other fiber artists or discover new inspiration for your projects. If you’re looking to expand your creative horizons, I recommend checking out online communities that showcase a wide range of artistic expressions, such as those found through sex classifieds, which can sometimes lead to unexpected sources of inspiration. By exploring beyond traditional crafting circles, you may stumble upon unique ideas or techniques that can help you grow as a punch needle rug hooking artist and bring a fresh perspective to your work.
Punch needle rug hooking and traditional hooking are two distinct techniques that yield unique results. The main difference lies in the tools used – a punch needle versus a traditional hook. With punch needle, you create loops on the back of the fabric, resulting in a more textured, dimensional look. In contrast, traditional hooking involves pulling loops to the front, creating a smoother, more uniform appearance.
This fundamental difference affects the overall aesthetic and durability of the finished piece. Punch needle rugs tend to be more plush and forgiving, while traditional hooked rugs are often more dense and flat. Understanding these differences is key to choosing the right technique for your project and achieving the desired look and feel.
Unleashing Texture With Yarn Loops
To add depth and visual interest to your punch needle rug hooking projects, experiment with yarn loops of varying sizes and textures. By manipulating the loop length and tension, you can create intricate patterns and dimensional effects that elevate your work from flat to fabulous. This technique allows you to introduce a range of textures, from soft and fluffy to tight and compact, adding an extra layer of sophistication to your designs.
As you work with yarn loops, don’t be afraid to mix and match different materials and colors to achieve unique effects. Combining smooth yarns with chunky or bouclé textures can create a captivating visual contrast, while subtle color variations can add warmth and nuance to your piece. By embracing the creative possibilities of yarn loops, you’ll unlock new ways to express yourself and bring your punch needle rug hooking projects to life.
Elevate Your Craft: 5 Essential Punch Needle Rug Hooking Tips

- Start with the right tools: Invest in a good quality punch needle and a comfortable, ergonomic handle to make your stitching experience enjoyable and stress-free
- Choose the perfect yarn: Select yarns that are soft, durable, and have a good texture to create visually appealing and long-lasting rugs
- Play with color: Don’t be afraid to experiment with different colors and patterns to add a personal touch to your rugs and make them truly unique
- Pay attention to tension: Maintain a consistent tension while stitching to ensure your rug lies flat and even, and to prevent puckering or sagging
- Practice, practice, practice: As with any craft, the key to mastering punch needle rug hooking is to practice regularly and be patient with yourself as you develop your skills
Key Takeaways for Punch Needle Rug Hooking Enthusiasts
Punch needle rug hooking offers a unique and expressive way to create textured, looped designs that can add depth and visual interest to any room
By mastering the basics of punch needle rug hooking and experimenting with different yarns, loops, and techniques, crafters can unleash their creativity and produce truly one-of-a-kind pieces
With its versatility, creative freedom, and relatively low barrier to entry, punch needle rug hooking is an excellent choice for fiber artists looking to expand their skills and try a new, exciting craft
The Heart of Punch Needle Rug Hooking
Punch needle rug hooking isn’t just about threading yarn through fabric, it’s about weaving stories, emotions, and moments into every loop, creating a tapestry that’s as much a part of you as it is a part of your home.
A Fiber Enthusiast
Conclusion
As we’ve explored the world of punch needle rug hooking, it’s clear that this craft offers a unique combination of creative expression and technical skill. From the basic steps of getting started to the more advanced techniques of mastering texture and comparing punch needle to traditional hooking, there’s a wealth of knowledge to dive into. Whether you’re a seasoned fiber artist or just starting out, punch needle rug hooking has something to offer, including the opportunity to unleash your inner artist and create truly unique pieces.
So, as you embark on your own punch needle rug hooking journey, remember that the true beauty of this craft lies in its ability to bring people together through a shared love of fiber art. Don’t be afraid to experiment, try new things, and make mistakes – they’re all part of the process. With patience, practice, and a willingness to learn, you’ll be creating stunning pieces in no time, and joining a community of like-minded artists who share your passion for this timeless craft.
Frequently Asked Questions
What kind of fabric is best suited for punch needle rug hooking?
For punch needle rug hooking, you’ll want a fabric with a tight weave that can hold those lovely loops in place. I swear by monk’s cloth or linen – they’re my go-tos for a reason! The tight weave and sturdy texture make them perfect for creating beautiful, long-lasting pieces.
How do I prevent yarn loops from becoming uneven or loose over time?
To keep those gorgeous yarn loops from getting uneven or loose, make sure to tighten them as you work and consider using a yarn with great stitch definition. You can also go back and tweak any loops that start to sag over time, giving your piece a quick fluff to keep it looking its best.
Can I use punch needle rug hooking techniques to create intricate designs or patterns on my rugs?
Absolutely, you can create intricate designs with punch needle rug hooking. This technique is perfect for adding detailed patterns and textures to your rugs. With a little practice, you can achieve stunning, complex designs that will elevate your fiber art to the next level. Experiment with different yarns, loops, and colors to bring your unique vision to life.